I have one more project to show you all using the First Frost Bundle and the Labeler Alphabet stamp set. I am so excited to tell you all about this project!
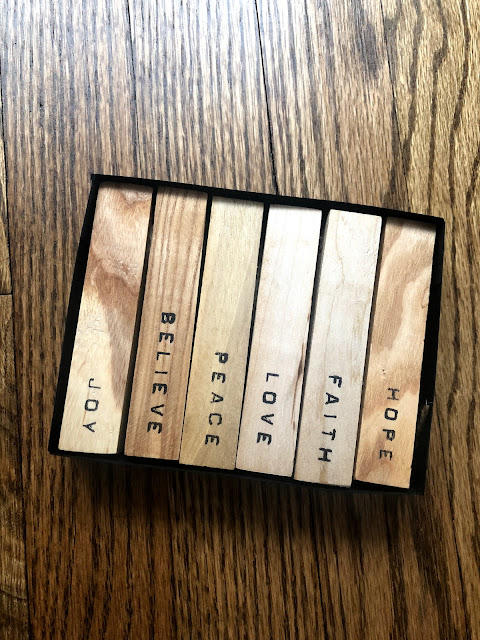
Last year before Christmas, I was searching on Pinterest and came across some cute ornaments that I knew I could recreate with the help of my boyfriend, Joe, who is a woodworker. He helped me make them, and I stamped words on them using my Labeler Alphabet set. When I was decorating my tree this year, I found them and fell in love with them all over again. A few days before I decorated my tree, Joe was asking me what I think he should make as gifts for people for Christmas, and when I remembered I had these ornaments, I said we should make some more sets of them.
So, we made a bunch of sets of our ornaments to give to family and friends for the holidays. After we made them, I was thinking about how we would package them to give as gifts. I saw some cute Christmas boxes and tins at Hobby Lobby, but Joe reminded me that the point of giving homemade gifts was so that we didn't have to spend money on them... 😊 I sat in my stamping room wrapping ribbon and twine around the sets of ornaments, and then it hit me. I can make custom boxes for them!
I have never created my own 3D projects. Every box I have made has been from a tutorial, so I knew this was going to be a challenge. But I am so happy with how they turned out! In all, I made the boxes using two different color palettes and eight boxes altogether!
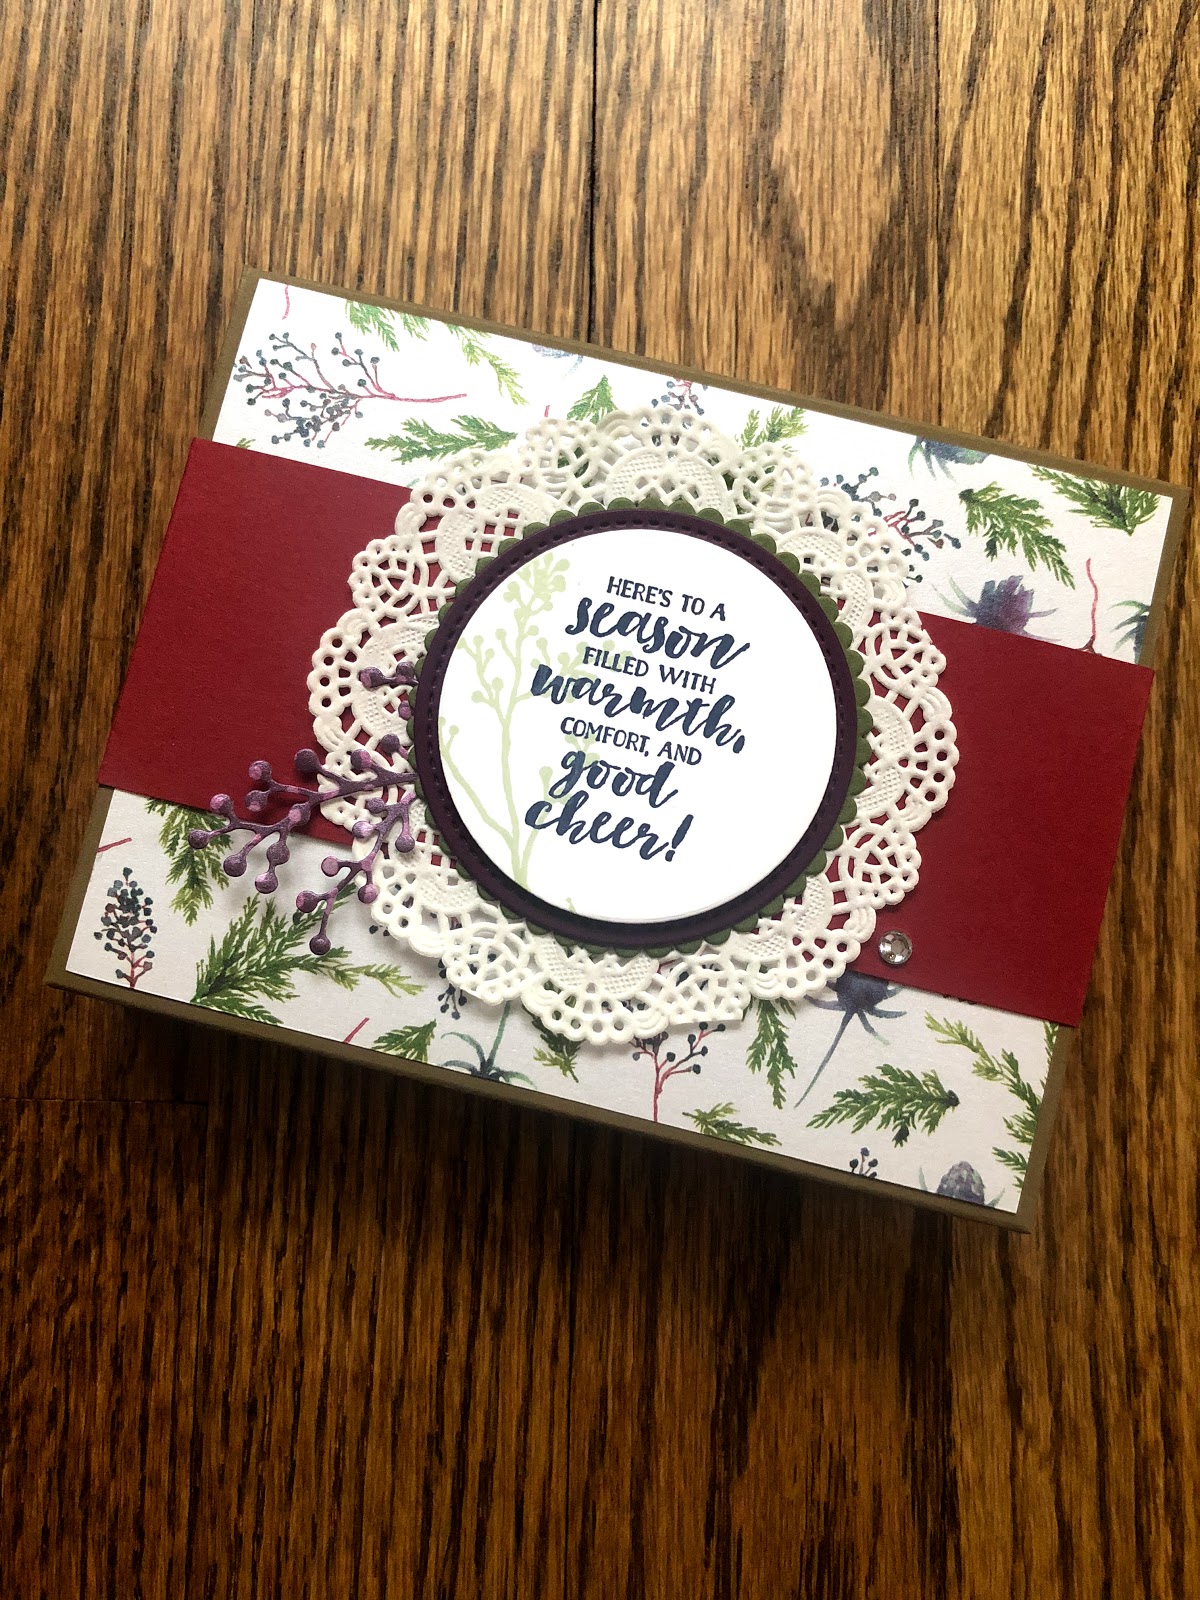
Here is a picture of the whole package that we will be giving as the gift. I used Basic Black cardstock to make the box. Then I covered the top with Frosted Floral Specialty Designer Series Paper. Isn't it gorgeous? Then I created a wrap to tie everything together. The focal point of it is the sentiment from the First Frost stamp set. I used the layering circles and stitched shapes framelits, a doily, and a branch piece which was a die cut from the Frosted Bouquet Framelets Dies.

I love that having to slide the wrap off the box and taking the top off the box is part of the experience of this gift! People are going to be so excited about what's inside!

Of course I had to add a small card on the inside- just something simple and hand-written.

And here are the ornaments! Aren't they beautiful? Since I custom-made the box to fit their dimensions (3/4" x 4" x 3/4") they fit perfectly in their packaging. I tied twine on them so they can hang from the tree. They are so simple but absolutely stunning- the perfect addition to any Christmas tree!
What I love about these is that they can be customizable. You could stamp any word on them or even stamp people's names on them to use as gift tags! Or stamp the year on them to create a keepsake to enjoy for years to come. The possibilities with these are truly endless!
Here is a picture of all of the parts of the gift once it is opened. Each aspect is filled with so much love and care!

Of course I could not just create all of the boxes the same, so for half of the boxes I chose a different piece of the Designer Series Paper to pull colors from. Here is what the other design looks like.


I don't know which version I love more! They are both beautiful!
I can't wait to give these to our friends and family for Christmas! Happy Holidays everyone!
Last year before Christmas, I was searching on Pinterest and came across some cute ornaments that I knew I could recreate with the help of my boyfriend, Joe, who is a woodworker. He helped me make them, and I stamped words on them using my Labeler Alphabet set. When I was decorating my tree this year, I found them and fell in love with them all over again. A few days before I decorated my tree, Joe was asking me what I think he should make as gifts for people for Christmas, and when I remembered I had these ornaments, I said we should make some more sets of them.
So, we made a bunch of sets of our ornaments to give to family and friends for the holidays. After we made them, I was thinking about how we would package them to give as gifts. I saw some cute Christmas boxes and tins at Hobby Lobby, but Joe reminded me that the point of giving homemade gifts was so that we didn't have to spend money on them... 😊 I sat in my stamping room wrapping ribbon and twine around the sets of ornaments, and then it hit me. I can make custom boxes for them!
I have never created my own 3D projects. Every box I have made has been from a tutorial, so I knew this was going to be a challenge. But I am so happy with how they turned out! In all, I made the boxes using two different color palettes and eight boxes altogether!
Here is a picture of the whole package that we will be giving as the gift. I used Basic Black cardstock to make the box. Then I covered the top with Frosted Floral Specialty Designer Series Paper. Isn't it gorgeous? Then I created a wrap to tie everything together. The focal point of it is the sentiment from the First Frost stamp set. I used the layering circles and stitched shapes framelits, a doily, and a branch piece which was a die cut from the Frosted Bouquet Framelets Dies.

I love that having to slide the wrap off the box and taking the top off the box is part of the experience of this gift! People are going to be so excited about what's inside!

Of course I had to add a small card on the inside- just something simple and hand-written.

And here are the ornaments! Aren't they beautiful? Since I custom-made the box to fit their dimensions (3/4" x 4" x 3/4") they fit perfectly in their packaging. I tied twine on them so they can hang from the tree. They are so simple but absolutely stunning- the perfect addition to any Christmas tree!
What I love about these is that they can be customizable. You could stamp any word on them or even stamp people's names on them to use as gift tags! Or stamp the year on them to create a keepsake to enjoy for years to come. The possibilities with these are truly endless!

Here is a picture of all of the parts of the gift once it is opened. Each aspect is filled with so much love and care!

Of course I could not just create all of the boxes the same, so for half of the boxes I chose a different piece of the Designer Series Paper to pull colors from. Here is what the other design looks like.


I don't know which version I love more! They are both beautiful!
I can't wait to give these to our friends and family for Christmas! Happy Holidays everyone!
Comments
Post a Comment